Monday, October 31, 2011

Weekly Attempt: Boxy Cosmetic Bag

Hello cuties! Hope you all had a wonderful Halloween weekend. I spent the first part of my Halloween night sitting around waiting for trick or treaters, and after I realized there weren't going to be any, I had a choice:

Facebook stalk, or use my spare time wisely and get a project done.
...Obviously I decided the latter!


 So, this weeks attempt was to make a "boxy" cosmetic bag. I've only had experience with making a very basic bag with 3 straight sides & a zipper, but this week I wanted to see if I could get a little more advanced, which spooked me a little, but I grew some cajones & began my research for patterns. Being a tutorial junkie, I found one that was perfect for my current skill level at ThreeBears. It seemed like something I could tackle in one evening, so I hopped to.

If you're going to try this project as well, here are some of the fixin's you'll need:
-Two contrasting fabrics, or one (whichever you prefer)
-Iron
-Sewing machine & zipper foot
-Rotary cutter & mat
-Zipper (I used 12")
-Clear ruler (as you can see mine is definitely not clear, which is just fine, but it can help with producing accurate/straight cuts)
-Fabric & pinking shears

Alert: The lighting in these photos is wretched, so I apologize in advance. 


Now before I show you more pictures of the finished product, let me take a moment to go off on a tangent here; I have a newfound love for my zipper foot. I was far too intimidated to even take my presser foot off, so I've previously avoided using my zipper foot all together. Now that I've become a sewing warrior (or at least working towards it) I realize how much easier it is to sew on a zipper, and how close it gets to the actual "teeth." So if you're like me, google how to change your feet, and give er' a go! You won't regret it. :)


I cut my two contrasting fabrics to 9" by 7" with my rotary cutter, you can choose any measurements your heart desires! Fold a half inch seam along the long side, then press with your iron so it will give a clean edge & stay put. Make sure you're folding as the picture shows below, with your right side of the fabrics being folded inward.


 Following the heat, pin those long folded edges to each side of the zipper, getting the folded edge as close to the teeth without covering them, & stitch with your lovely zipper foot. 

Once the fabrics are attached to the zipper, sew along the opposite 9" edge, stitching all four of the pieces together. Your result will show both sides open, so place the bottom seam directly on top of the center of the zipper.  Make sure you open that zippy about halfway, don't miss this step or you won't be able to turn your bag right side out! Being cognizant to make sure they match up perfectly, you can then sew along the remaining two sides, making sure to backstitch and go over where the zipper is an extra time for durability. This will be where the zipper begins & ends for your bag, so just cut off the excess leaving about 1/2".

This is where it got a wee bit tricky for me...
pinch the corners in, and find a good measurement (depending on how tall you want your bag to be) and pin. After you've achieved even corner measurements, stitch across that corner, and follow up with pinking shears to get rid of the excess and prevent shedding.
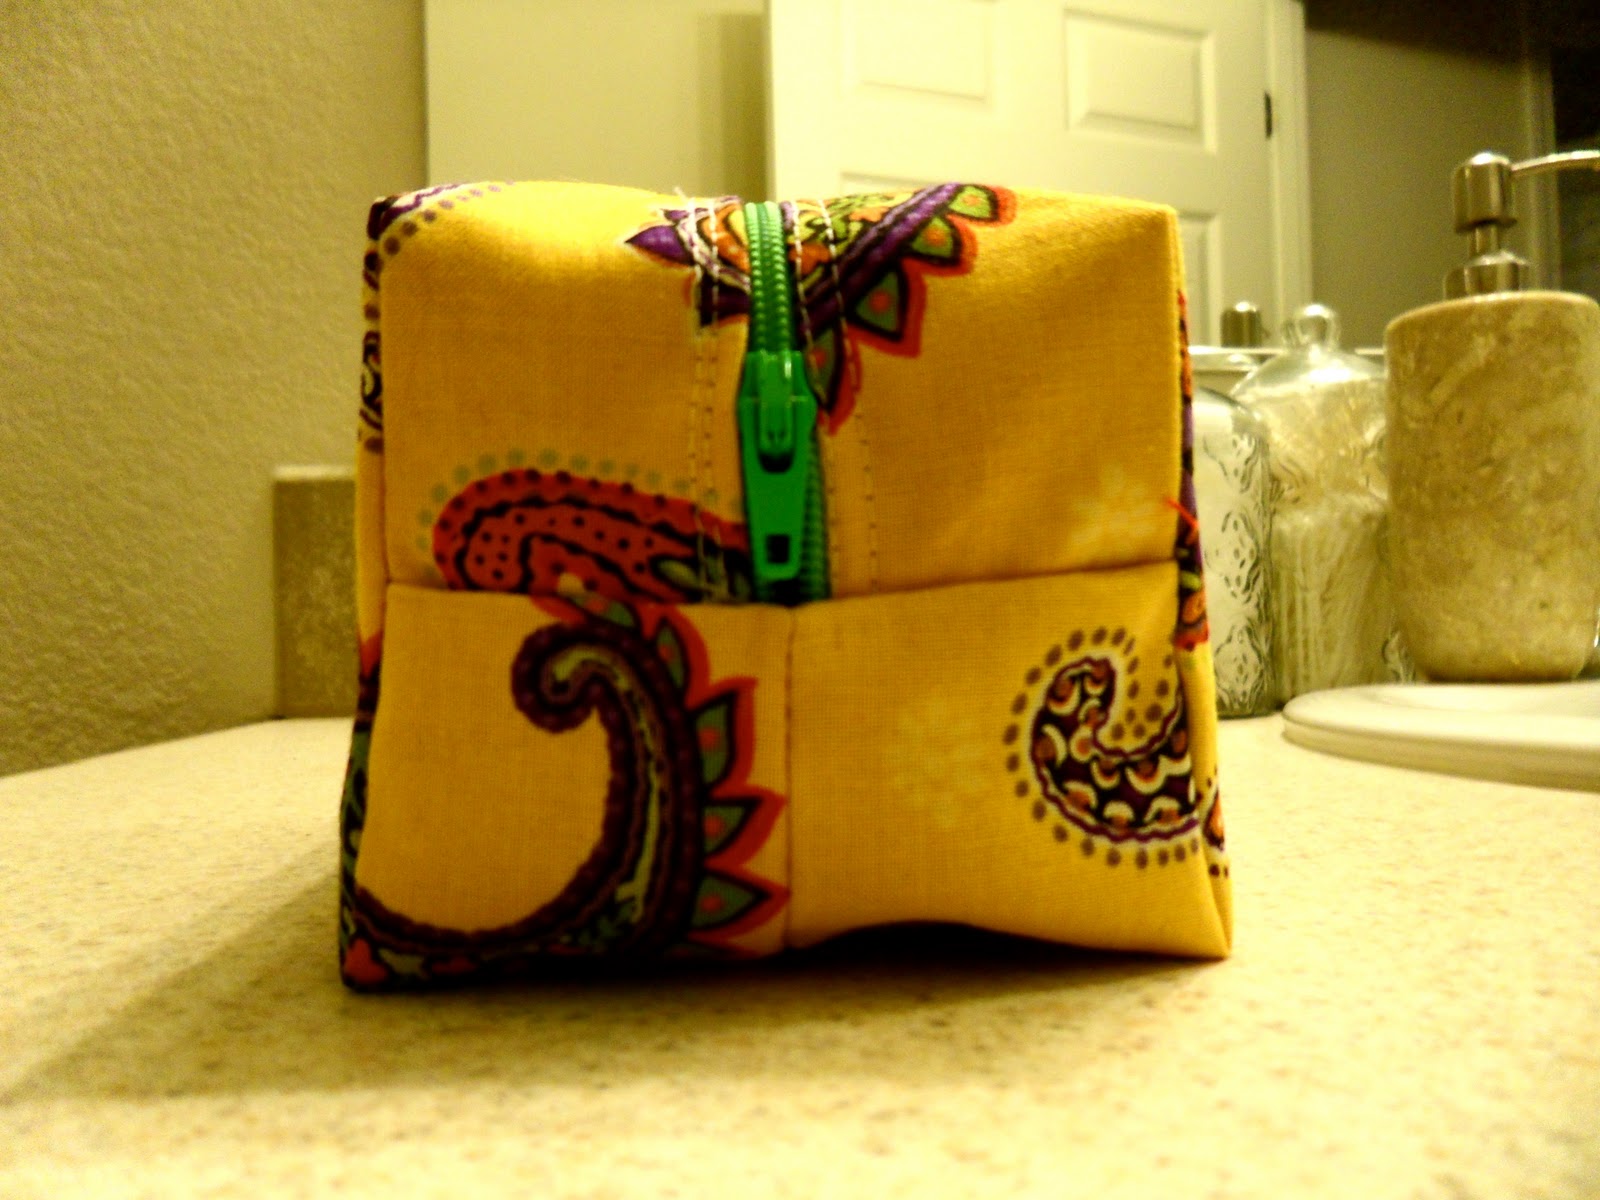
This should be your end result, hopefully even more fabulous than mine!

I used a paisley fabric, and I now realize I probably should have matched the print up where the sides meet at the zipper. 
I'm workin' on it...ok? ;)


Something I may add next time, is a little handle, or "flap," into the seam where the end of the zipper is located. I've seen this in other cosmetic bag photos and tutorials, and it adds a nice touch.

The most challenging step for this bag had to be sewing across the corners to create that boxy effect. I mean, I guess its not that difficult, but the OCD perfectionist in me thinks I could have gotten those measurements muuuuch more accurate.


The one step I added to the ThreeBears tutorial was that I added a liner (as seen above.) I used a poly/cotton blend, which is thin, and I also wanted to add some extra pizzaz to it. 

Next time I make this bag, I will use a vinyl lining so it's easy to clean out. I don't know about you ladies out there, but I use Bare Minerals makeup, and no matter how hard I try, it eventually gets everywhere in my current makeup bag. With vinyl, all you'll need to do is turn the bag inside out, wipe down the fabric with a damp cloth, and BOOM! All clean. :)

I discovered today that you can purchase fusible vinyl interfacing at Beverly's, Hancock's, or Joann's, which is music to my ears knowing that I don't have to search for the right vinyl or laminate fabric, I can just make it from any old fabric around the house. I seem to forget that stores don't stay open for night owls like me, so I will be going out to purchase this tomorrow :) 

Stay tuned for an update on how that interfacing works out...

I'm so pleasantly surprised with how simple this was, and how little time it took me to complete. Usually I have to mess one up beyond repair, and then make an entirely new one, but this time it was different! I think I'm getting better with reading directions carefully, and not rushing as much. :)

In closing, I know I've been awful with taking pictures as I go through each step myself, so from here forward, I will be working towards improving that. In the interim, take a lil' peep at the tutorial I hyperlinked for assistance! 

It's time for me to hit the hay, hope you come read again soon! If you have any tips, feedback, or comments don't hesitate to submit them below! 
One tired chick,
-Sierra

Thursday, October 20, 2011

A Wonderful Smelling Home

Salutations! I Just wanted to briefly share a homemade air freshener I stumbled across on The Complete Guide to Imperfect Homemaking. Its super easy, and I have a huge mason jar obsession, so this has been a way to put some of my collection to good use. :) Otherwise, this is a great way to recycle a pickle jar, or really any jar you have lying around the house. If you wanna get crafty, paint the lid a cute color with some Rustoleum spray paint, or do what I did and add a ribbon for embellishment.

What you'll need:
-Baking soda
-Essential oil (lavender is my fave, so that's what I used.)
-Any jar with a lid
-Hammer & Nail

All you do is fill your jar a little less than halfway with your baking soda, add 6-8 drops of essential oil (I add a few more, because I can't resist lavender) and then put the lid on your jar. Take the hammer & nail, and poke holes in the lid. I did the same thing as the tutorial I found, and poked mine in the shape of a heart. Presto! You're done! So much better than a glade plug in, right?! Right.


Tip: When it's not giving off that wonderful scent anymore, give it a little shake and that should do the trick. They last quite a long time!


The first one I made for my Mom's bathroom


My second one that is now in my bathroom. 

The tutorial was found here

Best believe there will be many more mason jar inspired crafts in the near future.
Happy crafting!
-Sierra


Saturday, October 15, 2011

Weekly Attempt: Makeup Brush Roll

As I was gearing up to leave for my short trip to Seattle, I found quite a few inspiring home made travel accouterments online, so I thought I would make something simple, and take a crack at creating a makeup brush roll.

I found so many tutorials online. I seemed to take on my own method and combine tutorials I found on youtube & various blogs. Some I found were a little too advanced for me, and we all know I'm horrible at following specific directions (something I must work on if I am going to eventually follow patterns etc.)

This actually didn't turn out half bad! The only issue is sewing in straight lines. Seems SO simple, but its not. Well, maybe it's just me, but I'm hoping other novice sewists out there have had the same issue.

I think the most difficult task was measuring and cutting the fabric. This in part was because I was stubborn, and thought I didn't need the rotary cutter & mat or a quilters ruler. Ummmm I was definitely wrong. With not being able to sew in perfect straight lines, on top of being helpless when it became to cutting accurately, I got an oddly ascending edge on my roll. It elevated as it ran right to left, which ended up having a weird lip in the fold as it rolled up. It wasn't too obvious, so I'm actually still happy with the end result, given my abilities thus far. :)

Confession: I actually made a tiny practice brush roll, and I highly reccomend any noobies out there give this method a try. It gave me a chance to experiement with some different placements and measurements, as well as a chance to mess some things up and learn from my mistakes!


On the inside of my roll, when I layed down the stitching for the brush slots, I again didn't follow directions well and kind of winged it, which left me with some slots that didn't fit my brushes so well. So word of the "wise." if you have your own specific set of brushes, make sure and measure them. If you're making it as a gift, take a look at what grip sizes brushes normally are, and try to follow that as best as you can.


As you see in this picture, I stitched the ribbon towards the back center of my first roll, which I ended up not being happy with. It looked unfinished to me, and just not right for some reason. 


On to my second brush...

This time around was much better, despite the uneven edge at the top, and a few other small hiccups. 

To make this I chose a solid & print fabric, and cut my fabric to the measurements of my brushes. I made sure to measure my tallest brush, and give it a few inches extra so I would be able to fold the fabric over. I also cut another print fabric piece to where the brushes would easily slide into them, and not fall out during traveling. I then ironed my fabrics, and pinned the small contrasting strip to the solid fabric, and took down my measurements of all of my brushes. I also decided to leave a gap pocket in case I want to stitch in extra brush slots later.

After I pinned/marked down my brush slot measurements, I stitched away! The reason I initially sew the slots into the solid fabric is so the stitching won't be seen on the outside of the roll in the end. 

Following this step, I then sewed the two large pieces of fabric "inside to inside" so that I could leave a 3" gap, and turn it right side out after stitching. I then stitched up that gap, which was my next mistake. I'm limited on thread colors currently, and I also stitched wayyyyy to far down, which ended up not looking as pretty as I had hoped. 

Then, I ironed, and sewed on my ribbon! As I said earlier, I tried a different ribbon placement, and this one was folded in half (not quite half, I left the side that would wrap around the roll larger so the end result would look even) and stitched it on the inside of the roll, about half way down. 

Reflecting back on my first weekly attempt, I learned to watch my stitching & cutting, and to really take my time with every step. I tend to rush through things sometimes, which then causes some not so wonderful results. I'm thrilled that sewing has been teaching me patience and precision, because those are two attributes I lack personally. 

Voila! My attempt!


See that top edge? Oh boy...

The extra pocket


And, the top edge when I roll...

Off to purchase a rotary cutter & mat,
-Sierra


Wednesday, October 12, 2011

White Walls, Colorful Rooms

With the possibility of Ryan & I moving to Washington becoming more & more of a reality, it got me thinking about interior design (shocker; it seems like that's always on my mind). Those who know me well, know that I started my post high school life pursuing a career in interior design. I decided to change my career path, but not for a lack of passion for the field. I just felt I needed to be in a profession that had more financial stability & job security. Anywhoo, thinking about moving from sunny California to not-so-sunny Washington reminded me of how I learned that interiors can alter a persons mood, health, & overall well-being. 

Off topic: I always wondered why there wasn't more funds directed towards interior design in hospitals. That's the place where uplifting design is needed most, so why is it seen as unimportant? If we use cool colors and muted tones in a spa to give clients a sedative and calming effect to enhance their experience, why wouldn't we direct color theory & design towards people who are sick & dying? Just sayin'...

Alright, back on topic.

I've heard from quite a few friends who have made the move & adjustment to Washington, & their chief complaint is the sunshine, or lack there of for about 4-5 months out of the year. I can see how difficult that could be coming from a state that really doesn't have clearly defined seasons. We find ourselves spoiled, and at times complaining when the temperatures drop below 50 & when we have rain for more than 3 days...What amateurs! ;)

This brings me to my point: a light bulb went off in my head today. If we're going to be making an adjustment to the climate change & the "lack of sun," then creating a sunny & colorful environment inside will make a huge difference! I'm focusing on white walls, since ideally I will be moving into a townhouse/condo or apartment where I may not be able to enhance my home with a touch of paint. Which will only lead me to get creative! So here are a few pictures of inspiring & colorful rooms! 
Photographer Roger Davies


Let me know what you think, I love feedback & bouncing ideas around.
-Sierra


Sunday, October 9, 2011

My Machine & Notions; A Love Story

Re discovering my sewing machine had to have been the highlight of my year. Not only did it get me started with this blog, but I've realized sewing is a huge form of therapy for me. I had completely forgotten about this magical piece of machinery until I was helping my mom clean the heaping amounts of stuff out of her garage over summer. Amongst all the piles of dust and junk, I spotted my beautiful Singer. Thank he lord I at least kept the machine cover on it!

Problem was...I forgot how to use it. Really.

Whether it was threading the bobbin, putting on a new needle, or even adjusting the thread tension I had no idea where to even start. I hadn't touched a sewing machine in almost 4 years, could you blame me for forgetting? On top of this issue, I found that the manual was missing! Now, I don't know about all of you, but I don't do well with manuals, they frustrate me to no end. So, instead of getting my manual offline, I decided to contact my high school sewing teacher to see if she could assist me. Gladly, she was more than willing to help me regain the basics and bond with my machine. I am still amazed at how much I had completely forgotten!

After reconciling with my beautiful baby Singer, I realized I didn't have any notions! Just 1 bobbin, and an extra needle. I then jumped onto my computer to look up some recommendations of necessary tools and tips. While conducting my research, I discovered some blogs that gave me amazing help. If any of you are new sewers out there, and need tools like I did, then these blogs will guide you!

Caseybrowndesigns.com

Sewchicandunique.com

Since we are currently living with my Dad for the next three months, I don't have an area to keep my machine at a desk or table, let alone an area to keep my supplies stationary. This is honestly such a hassle, but as they say....When life gives you lemons, make lemonade! The solutions I found were keeping my fabrics in a basket (which I am currently using as a cute little door stop) and I purchased a 10 dollar tool bag from Walmart to keep my notions in. I bought the very basic tools necessary such as pins, thread, bobbins, extra needles, fabric and pinking shears, seam ripper, seam gauge, as well as a water soluable marker. Something I realize now that I need more than I thought is the rotary cutter and self healing mat. I thought I could live without these tools until I got more advanced, but boy was I wrong! Life would be a whole lot easier when I get those bad boys. Soon enough I'll be off to my 1 hour drive to Beverly's to pick those up!

Purchasing these tools when you are on a budget keeps things on a "purchase when it becomes necessary" basis. I am still in the process, so I'll post an updated version when my tool collection is finished.

Something I did, which took up a lot of time was finding some of these tools for cheaper on Amazon.com This proved to be more difficult than I thought because majority of these tools are of course sold separately, which meant that with shipping included from all of these different companies, it would end up costing more than just purchasing it all from the store. However I did find a few tools that gave me my amazon prime 2 day shipping. By the way, if you're a college student, go out and get amazon prime! It's free for you little book worms, and the benefit is amazing. I highly recommend it. :)

Purchasing these tools when you are on a tight budget keeps things on a "purchase when it becomes necessary" basis. I am still in the process, so I'll post an updated version when my collection is complete. But for now, here is my little sewing set up!


Workin' on my sewing set up...slowly,
-Sierra


Wednesday, October 5, 2011

The Quest

Welcome reader (if I am that lucky!) Although I'm most likely blogging to myself right now since this is so fresh & new.

I created this blog to keep track of my improvements and mistakes along the road of reaching domestic bliss...if I ever do get there. ;) Cleaning, sewing, DIY/crafting, to cooking, it will all be documented from this point forward! I've spent much of my time reading many different blogs spending countless hours bookmarking crafts, tutorials, recipes, and interesting posts along the way. I'm always amazed at how these people end up making a name for themselves simply by documenting their experiences. Then I realized, there are probably just as many people out there like me, who read up to get ideas and inspiration, or even to cure a nasty case of boredom. Then I thought to myself, why can't I do this? Even if nobody ever reads a word on this page, I will still be benefiting from this web page by chronicling my adventures in making my house a home, no matter where I am (I'll also probably improve my writing skills too, hah.)

I hope you enjoy checking in and reading up on my page!
My new motto...
You can't learn without making some mistakes along the way, am I right? :)
-Sierra