Monday, August 27, 2012

Guilt Free Ice Cream, Hallelujah!


My dream has come true. Ice cream, without the guilt?! Those are some pretty lofty claims coming from Use Real Butter.  I have to say, I've made this quite a few times after stumbling upon this recipe on none other than Pinterest, and I've got to say,
I'm in LOVE.
It's the perfect cure for my nightly, yes nightly, nagging sweet tooth. 


This is literally all you need! 
-Cocoa powder (unsweetened)
-Bananas (2-3, ripe)
-A dash of milk (I use either soy or almond but regular is great too)
-Peanut butter (I've used PB2, but prefer the real stuff for this recipe)

First step is to slice your bananas and toss those babies in the freezer for an hour or two. If you're like me and usually make things like this on an impulse, keep some frozen bananas handy in your freezer. 

Once they are good & frozen, put them into your food processor & add just a dash of your milk, like so:


Then chop and grind! They will turn into a pebbly mixture, and then eventually turn into wonderful creamy goodness!


Mmmmmm creamy goodness.

Last step (these are easy, huh?!) Put in 1-2 tsp of your peanut butter, and 1-2 tsp of your cocoa powder. Give your food processor a few more pulses and you've got your "ice cream" ready to eat! 

YUM.
Enjoy :) 

Easy peas'y & lovin' it,
Sierra

Thursday, August 9, 2012

Rug Obssesed

Lately I've been dreaming about rugs. Printed rugs, solid rugs, yellow rugs, coral rugs, you name it. Alas, it's nearly impossible to find one in my budget.

A tight budget.
Like a really really tight college student budget.

I've seen many of my fellow bloggers out there showing off their DIY painted rugs, but I just don't know if those are durable, or good looking enough. Photos sometimes don't show what an object really looks like. Plus, I think I'm honestly a little afraid to attempt the project.

I would loooveeee a few area rugs for my dining room, living room and bedroom. So, while I work up the courage to attempt that kind of DIY project, I'll just drool at these in the meantime. 

I adore this Moroccan motif with a punch of pink from Shades of light

I've never seen anything like this before! Looks like a slice from a tree (Calfinder)

This forest inspired room has an adorable faux wood rug. (Houzz)

I'm a sucker for neutrals, so of course I love this cecil rug from Bloigg Plus

Can you believe this is a standard ikea rug? With a painted motif of course, from Pudel Design

Even though chevron stripes are slightly overused these days, I can't help but love this beach cottage inspired painted rug from The House of Smiths

And lastly, this is a memory foam bath mat painted, from The Idea Room


What kind of rugs do you have in your house?
Neutral or a punch of color?
Store bought or DIY? 

Living with naked floors,
Sierra

Friday, August 3, 2012

Vintage Dresser Facelift

Hello there! Hope you are all enjoying the sunshine today, I know I am! I can't get enough of my first Washington summer, it's amazing. 

Lets get down to business: Once I reassessed the furniture in my garage waiting for makeovers, I came across a dresser. This piece is truly a gem to me. It originally sat in the guest bedroom of my grandparents house, which brings back an endless amount memories. I'm not one usually comfortable with change when it comes to nostalgic pieces, but this dresser needed some work.


 I began brainstorming about colors, and after countless paint supply stores and searching, I narrowed it down to Valspar Swim, which is a very bright turquoise color. Bringing that paint can home completely alarmed my boyfriend, and he was even more alarmed after the first coat (after sanding & primer of course!)
Yes, I do look quite glamorous when I paint. ;)

Pretty bright huh? Stick with me.

After a few coats and some brown translucent glaze, I ended up with a gorgeous aged looking turquoise; the rich dark brown, the bright turquoise, it looked wonderful.

But then...
The protective coat happened.

I've used this same protective coat many times, even over this same glaze but for some reason, the glaze ended up looking splotchy, and almost seemed to be brushing away during the process. And if any of ya'll are wondering, I most definitely waited the allotted week for the glaze to dry, so I'm a little stumped on this one.


Look at that side! Ugh, insert sad face here. :(

So. Although I am not 100% pleased with the result, it will do for now. Luckily, I enjoy doing this more than almost anything else, so I have no problem starting over at some point...just not today. 

If any of you out there have tips, tricks, or any feedback, let me know. I'd love to hear from you! :)

Still growing & learning,
Sierra


Saturday, July 14, 2012

I'm Baaaccccckkkk

I'm giddy like a school girl!

I can finally say that both the weather, and my schedule are cooperating and I can get back to refinishing furniture now! The Washington weather doesn't seem to be the right place for someone like me who enjoys transforming furniture. Now it's finally starting to act like summer here, so I'm wasting no time! 

Can you tell I'm excited?

My garage awaits me. Stay tuned. :)

Friday, February 17, 2012

Work in Progress: Sprucing up the laundry room

School & work has been kickin' my booty, so I haven't had much time for my creative outlet lately. =(

So for now, here's just a small update on sprucing up my laundry room. This room came with a closet maid wire shelf that I put my bed linens and towels on, so to hide the clutter I put up a nice tension rod with some white curtains. Since the measurements from the ceiling to the bottom of the shelf were around 40 inches, I bought some sail cloth curtains at target on sale for $9.99, and hemmed them. 

I also talked my boyfriend into hanging a shelf that we purchased at Ikea, and added some baskets for my dryer sheets and other accessories. 


By far my favorite part of this work in progress is where I store my laundry detergent & fabric softener. There's nothing worse than seeing those horrid plastic bottles hanging around (at least to me, I'm a bit OCD though.) I purchased the white fabric softener dispenser (originally to dispense oil) at Target for $5 on sale! I swear everyone needs to take advantage of those end cap shelves that they hide so well, I always find great stuff there. The laundry detergent dispenser is actually a beverage dispenser that I got at Cost plus also on sale for $15. The rug I purchased at TJMaxx.


Raisin also wanted me to make sure he got into the shot. 


My entire house is always a work in progress, I'm constantly changing and switching things around so I'm sure this will look slightly 
different in a few months. But for now, I'm satisfied. :) 

More posts later, promise!
Sierra

Saturday, January 14, 2012

Savory Spinach Pasta

I have been putting forth maximum effort to branch out & try to get away from the chicken with rice & salad doldrums. Through my hours of aimless web surfing, I found this unique pasta recipe on Running With Tweezers. On top of being ridiculously tasty, it has few ingredients, making it simple to make.

And come on...who doesn't like simple?


The recipe calls for spinach, lemon juice & lemon zest, parmesan, marscapone & fusilli (spiral shaped) pasta. The original recipe has measurements, but after making this once I realized it doesn't take any measuring at all. Just eye ball it, trust me it will turn out just as yummy. 

You basically throw it all into the food processor, zap it for a few seconds while the pasta is boiling & then combine after the pasta is drained. I like to grate a little extra parm on top too. :)


Tada! Savory, beautiful looking pasta that takes all of about 10 minutes to make. And isn't the color gorgeous? Hope you all enjoy this recipe, and your Saturday!

Princess Pasta,
Sierra


Sunday, December 18, 2011

Short & Sweet: Organization Idea

Hello everyone! I have been unbelievably busy preparing to move out of state with my little family (2 cats & my handsome man) so I have been very behind on getting posts up. All of my furniture & crafts have been already moved to Washington (which by the way makes me miserable) so I thought I would post a little somethin' pertaining to organization.

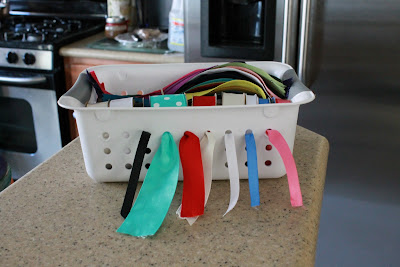
I have many, many ribbons. Pink ribbons, white ribbons, small ribbons, large ribbons, you name it! This is one amazing way to organize and keep your ribbons from tangling. I myself have been frustrated on numerous occasions trying to find a piece of scotch tape to hold the ribbon on it's roll, then having to peel it off for the next use. Or even worse, messing with rubber bands. Argh, hate that. Anyway, this method gives easy access, with compact storage.

I originally found a photo of this on pinterest, and immediately jumped up and ran around the house like a chicken with my head cut off because I knew I had the same basket...but didn't quite remember where. That's pretty typical of me, since I'm almost always misplacing my car keys & cell phone. :) Fortunately, I found it after minimal searching. *insert sigh of relief*

Since my crafting supplies are over a thousand miles away from me, I didn't have many ribbons on hand to display for the photo. I stuck my zippers for sewing behind the ribbons to hold the rolls tight. Once I'm re united with my crafts, I'll be able to put ribbons on the other side as well. :)

Hope this short & sweet post will inspire you to organize your crafting supplies, or heck, organize other parts of your house!
....yeah, right. That can wait. ;)

Washington bound in 12 days,
Sierra